Constructing a LEGO pizza truck offers business owners a fun and engaging way to represent their culinary aspirations. This imaginative project not only enhances creativity but also serves as an excellent promotional tool to connect with customers of all ages. In the chapters ahead, we will explore how to establish a solid foundation for your LEGO pizza truck, craft its main body and operational components, and finally, add enticing details that showcase your unique pizza offerings. Each chapter builds upon the last, culminating in a complete and vibrant LEGO representation of a pizza truck that can draw interest and inspire conversations about your mobile food business.
Laying the Chassis: The Hidden Engine Behind a Stable LEGO Pizza Truck
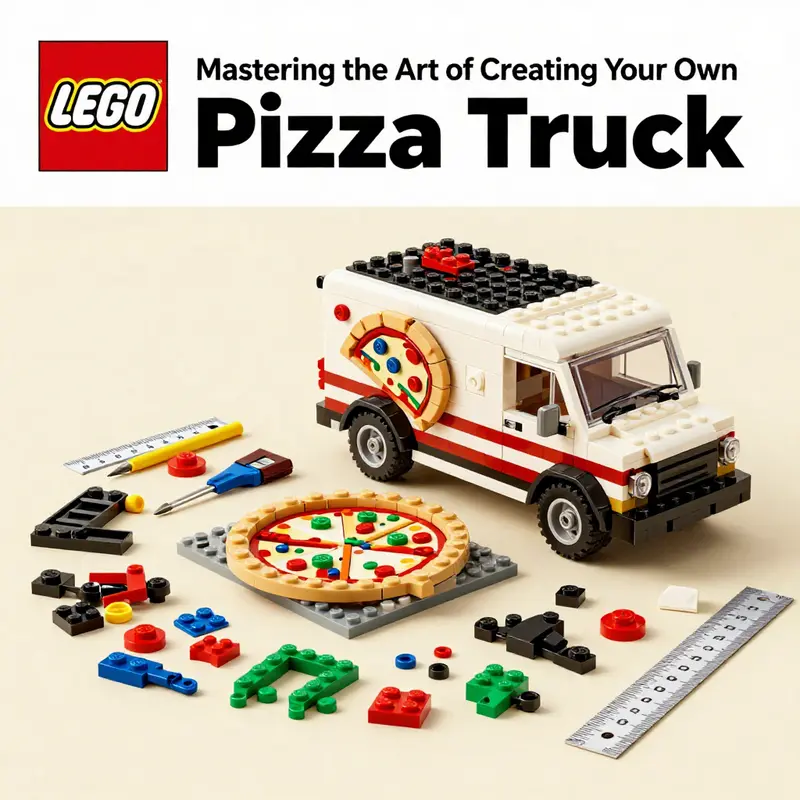
The base of a LEGO pizza truck is more than a platform. It is the spine that carries every other idea you have for the model. When you start with the chassis, you decide how sturdy the body will be, how smoothly the wheels will turn, and how securely the play features will hinge into life. A well-planned base keeps everything aligned, prevents sagging under the weight of a door, a display counter, or a tiny oven, and quietly supports the storytelling that will unfold as you push the truck across a table or a pretend street. The base is not a backdrop; it is the engine of stability, a canvas on which you can paint the movement, the function, and the character of your pizza delivery dream.\n\nTo begin, you imagine the truck as a small commercial vehicle designed for constant movement and frequent stop-and-go service, a vehicle that must carry the warmth of the ovens and the bright display of fresh pies while surviving the bumps and turns of daily delivery. That mental picture guides every brick choice, every plate, and every gap. The chassis—those interlocking pieces that form the frame—becomes the first, most consequential decision. The goal is to assemble a frame that feels solid in your hands, one that resists flexing when you lift the rear to check the mechanism and that welcomes additional modules without wobble. You are not merely building a box; you are laying out a working lattice that will absorb jolts, support an extending counter, and provide anchor points for the pull-back launch system if you decide to include one. With a robust base, the rest of the truck can grow without becoming top-heavy or unstable.\n\nThe process of creating that base begins with the chassis itself. Think of the chassis as a skeleton: it is a network of bricks joined in just the right way to form a rigid frame. The joinery matters as much as the bricks themselves. A good chassis uses a combination of long and short elements, carefully cross-braced so that the tension and compression within the structure balance out. The layout should be symmetrical along an axis or two so that gravity does not tilt the truck toward one side when you place a display counter, a pizza oven on the side, or even a working mechanism. As you lay the pieces, you are testing ideas in your hands. The feel of interlocking bricks when a corner is squared, or the way a plate sits flush against a beam, tells you whether you are building for strength or merely for shape. In these early moments, you are choosing between a frame that is quick to assemble and a frame that is reliable for hours of play. The better choice is often the slower one, because it endures the long story you want to tell with your model.\n\nA crucial portion of the base is the integration of axles and wheels. The wheels are not just decorative accessories; they are living parts of the truck that your users will push, pull, and tap with little fingers, a common scene in make-believe kitchens and drive-throughs. Proper axle alignment matters more than you might think. Misaligned axles create drag, cause uneven wear on the tires, and can even throw the whole model out of true when you try to add a front display case or a rear delivery box. The goal is to have a four-wheel setup that rolls smoothly over the playing surface. That means ensuring the axles sit securely in their housings and that the wheels are mounted with even gaps between each other. When you test the rolling action, you should be looking for any binding that indicates an obstruction in the axle or a misfit between bricks that should be flush. A single snug fit in the right place makes the difference between a truck that glides and a truck that grinds.\n\nIn this chapter, you will often consider the idea of a proactive, modular approach. The base should be designed with future modifications in mind. If you imagine adding a side oven, a tiny front counter, or a pull-back launch mechanism, you want attachment points that don’t require disassembly of the core frame. This forward thinking is not about over-engineering; it is about foresight. The base can host different modules as long as there is a common, sturdy platform that accepts them without sacrificing stability. A clean, well-braced base allows for the simplest additions to sit flush against the body, minimizing the risk that a new piece will cause the entire model to lean or sag. The beauty of such a design lies in its balance between simplicity and adaptability. A few thoughtfully placed studs, a couple of reinforced bricks, and a couple of plates can become a foundation for dozens of variations, from a bright display to a hidden oven that slides out for a dramatic reveal.\n\nFor those who want a peek into a classic, proven approach, the lift between imagination and execution can be bridged by a pull-back mechanism, a feature that brings a sense of action and play to the base without complicating the overall build. The pull-back concept is a favorite in pizza-truck fantasies because it transforms a simple truck into a small, kinetic stage. The idea, in short, is to anchor a lever or pull rod to the chassis and connect it via an elastic band to a release catch on the body. When the lever is pulled, the rubber band stretches, storing energy. Releasing the lever converts that stored energy into a quick burst that can propel a small, lightweight projection—like a pretend pizza—forward along a short arc. The science is straightforward but delightful: you are converting potential energy into kinetic energy in a toy scale. The cable or rod must be connected with care so that the action travels in a straight line and resets reliably after each launch. Secure connection points are essential. Loose joints at the base will not only frustrate you when the launch fails, but they can also misalign the entire frame as you re-cock the mechanism.\n\nIf you choose to implement a launch system, you should view the base as a testbed. The base will repeatedly contact stress as you pull, release, and re-cock, so the attachment points must hold under repeated cycles. Engineers who design working models often reinforce these spots with small grids of plates and with bricks that lock together in ways that resist flexing. The idea is not to hide these reinforcements behind the cosmetic elements but to weave them into the core frame so that the outer appearance remains clean and true to the design. A well-executed base maintains the illusion that the truck is a single, cohesive object, even as you add moving parts, a dual-layer display, or a side oven with doors that swing in and out. The base will be on stage more than once, and when you lift the model to inspect a new module or to test a print of a pizza on a tile, you want to know that everything below sits firmly and safely.\n\nThe base is also where you decide how much weight to place toward the front or the rear. Distribution of mass influences how naturally the truck sits on its wheels. If too much weight leans toward the front with heavy headlights, a bulky counter, or an oven built into the upper portion of the body, the rear may ride high and the front tires may grip unevenly. If you balance weight across the span, the truck will look more like a real vehicle, with a grounded front and a confident back. You can achieve this balance by experimenting with different placements for the oven, the counter, and any signage you intend to mount on the base. The aim is to keep the center of gravity low enough to prevent wobble during play, while still allowing a pleasing silhouette that reads well from the front and the sides. A careful balance makes the display area more accessible, too. When the pizza display is integrated smoothly into the base, it feels natural to slide a slice of pizza forward and place it on a stand, which encourages storytelling and interaction rather than mere decoration.\n\nAs you refine your base, you begin to notice that the base itself becomes a guide for the rest of the build. You may discover that certain alignments reveal better pathways for a future sliding tray or a door that swings with a satisfying click. You may also find that the base offers a quiet place to hide micro-details—a tiny cash register, a receipt print—without disrupting the outer lines of the truck. When the base achieves this level of harmony, you have earned the right to add the more visible features: the large, bold signage, the glass display, and the warm, inviting oven area. Yet those features will feel more authentic and perky when supported by a base that remains true to its purpose: to hold everything together with strength, to roll smoothly, and to invite exploration during hours of play.\n\nTo maintain momentum in the build, you can adopt a lightweight, iterative approach. After you assemble the chassis, test-assemble the wheels, and secure the axles, you should pause to inspect the frame for any flexing when you press on it with your finger. If you sense a give or a hollow sensation at a joint, you know you need to reinforce that location. A quick add of a plate, or a small cross-brace under a prominent joint, often eliminates the issue. The idea is to keep the base adaptable but never unstable. In the context of a pizza truck, where movement and function mirror the act of serving customers, a solid base is the unsung hero of the story—quietly doing the heavy lifting while the pizzaiolo minifigures the magic of fresh slices and speedy delivery.\n\nFor readers who want to extend their craft beyond the kit, the base offers a blueprint, a practical map for customizing their own chassis. The base gives you a framework you can grow with: more robust supports for a larger oven, stronger anchors for a side display, or modular clips that allow the truck to switch between delivery mode and storefront mode with minimal fuss. You can design the base to accommodate different scales, allowing room to experiment with new shapes, new textures, and new storytelling beats. The more you practice with the base, the more confident you become about where to place the next piece, how to handle the next module, and where to keep the balance that keeps the vehicle from tipping during play. The base is not a mere starting point; it is the durable memory of the build, the track on which every subsequent idea will travel, and the quiet force that makes your LEGO pizza truck feel real even as it remains unmistakably a toy.\n\nIn this journey from plan to movement, you will likely consult a handful of classic reference guides and instruction collections. A practical path is to study robust chassis designs from established, vehicle-focused builds, then translate those ideas into the LEGO vocabulary you love. Think about how well engineers in the real world distribute support along a frame; your job is to translate this principle into bricks, plates, and beams, choosing connections that will not loosen over time or with frequent handling. The resulting base will carry weight with grace, absorb the occasional jostle, and still serve as a stage for the pizzas to shine. It will invite you to push a little further, adding more details and play features with confidence because the ground beneath is solid, stable, and ready to support whatever you dream next.\n\nFor readers seeking a concise guide or a direct set of steps, there are build manuals and reference guides that can translate these principles into a concrete plan. The essential takeaway is simple: start with a strong chassis, secure the axles, integrate the driving wheels with care, and plan for future assemblies that won’t destabilize the frame. When you treat the base as a living part of the model, you never have to apologize for a wobble or a misaligned counter. Instead, you can focus on the joy of shaping the display, the glow of the oven, and the delight of creating a world where a little minifigure can deliver warmth and flavor with a satisfying roll of the wheels.\n\nTo deepen your practice, you can explore the official parts and instruction resources as you refine your base. For instance, you can consult the official brick-instruction database to see how professionals assemble a complete truck chassis and how they address common challenges like axle fit and plate alignment. how-to-build-a-pizza-food-truck provides additional context about modular design and how builders adapt frames for different configurations, including a pizza display and a launch-ready platform. Such references can be a source of fresh ideas while you keep the core principles that make the base strong at the center of your build. If you prefer a direct, hands-on reference, the LEGO instruction manual for the LEGO City 7598 Pizza Planet Truck walks you through a chassis-first approach, showing how a solid base underpins the entire model. This is not a distraction from your own design; it is a blueprint to help you see how a base can be sturdy, functional, and elegantly simple at the same time. You can access these instructions through the official platform, ensuring accuracy and clarity as you realize your pizza truck in three dimensions.\n\nFor more detailed, visual guidance, you can refer to the official instruction manuals and building guides, which provide step-by-step diagrams that can serve as a blueprint for your own robust base. The process might begin with a wide, flat base and progress toward a compact, braced frame that will support the sides and the oven area. The sequences emphasize alignment, secure connections, and the practical use of signs and counters to add personality without compromising the frame. Remember, a great base is not a limit; it is a launching point for creativity, a foundation that lets your pizzas travel through a story rather than simply sit on a shelf.\n\nExternal resource for deeper practice: LEGO brick instructions for 7598.\n\nInternal link for further reading within this article series: how-to-build-a-pizza-food-truck.\n\nTogether, the base and the features it supports become the backbone of your LEGO pizza truck, enabling you to tell richer stories, invite more imaginative play, and refine your technique with every new configuration you try. The base may be hidden under the bustle of bricks, but it never stops being the quiet, essential partner in your design journey. When the frame is solid, the rest of the project can rise with confidence, and the pizza truck you imagine can roll into your world with the ease and reliability of a well-built vehicle—one that looks the part, moves with grace, and invites others to join in the fun of building and storytelling.
Shaping the Hull of Flavor: The Body and Moving Parts of Your LEGO Pizza Truck
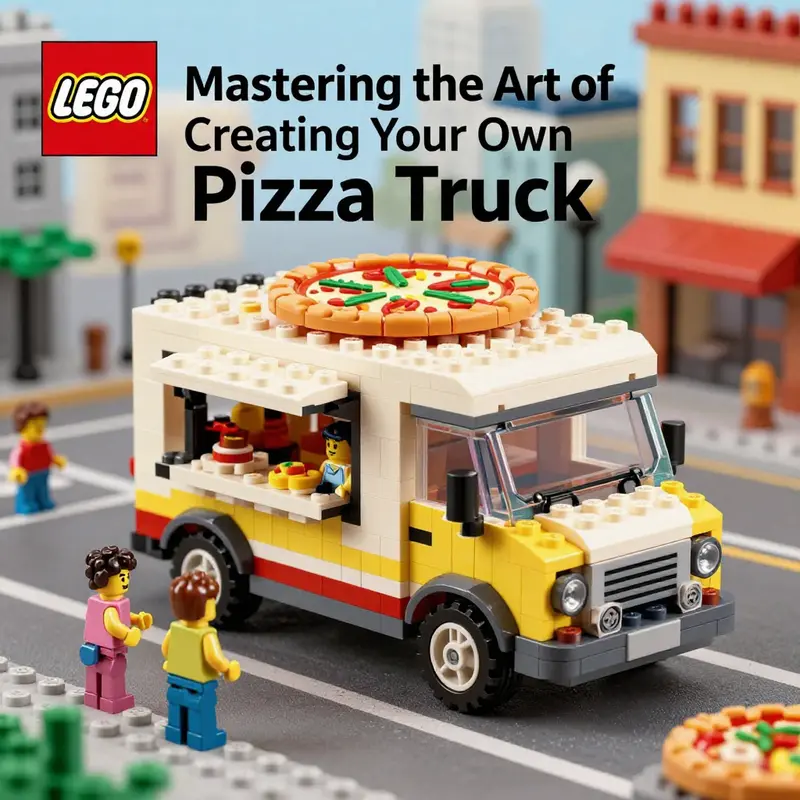
The body of a LEGO pizza truck is more than a shell; it is the stage on which every gesture of play, every whiff of imagined aroma, and every quick roll of a delivery mission come to life. When you begin shaping the chassis, you are not merely assembling bricks. You are laying down the backbone that will support a busy kitchen, a customer counter, and the little mechanical moments that make a build feel alive. The guiding idea is simple: start with a sturdy base, then layer in the shape and function that will keep the model balanced and engaging as a display piece and a toy. In practice, this means choosing a foundation that can bear weight, and then choosing brick heights and plate thickness that avoid a sagging midsection when you attach doors, shutters, or a display counter. A well-made baseplate or a larger plate set acts like a sturdy floor for a busy street vendor, and that stability matters when the chest of drawers that becomes a kitchen island, or the retractable delivery cart, finally clicks into place. The process rewards patience as you fine-tune alignment and connection points so doors swing with confidence and the oven section rotates without catching on the edge of a tile. The body of the truck then becomes a canvas for color and character, a geometry that invites you to imagine the sizzle of a pizza oven, the glow of a kitchen light, and the rhythmic shuffle of minifigure staff performing a shift on a busy curbside corner.
Color is not merely cosmetic in this design. It is a cue that signals the truck’s identity and mood, a quick map for play where a red and white scheme suggests classic street-food energy, a yellow accent hints at warmth and brightness, and a touch of black or gray grounds the entire ensemble in a sense of utility. The color choices should feel intentional, not random. Red can frame the vehicle’s curves and reinforce its role as the lead in a culinary parade, while white panels offer clean, high-contrast spaces for a chalkboard menu or a drawn logo. Yellow trims can highlight the oven hatch or the countertop edge, guiding the eye to the heart of the operation. These choices also help with scale. In LEGO terms, a strong color contrast helps the eye distinguish different areas—a window line, a door, a serving hatch—from the solid mass of the body, so the model reads clearly in photos and during imaginative play alike.
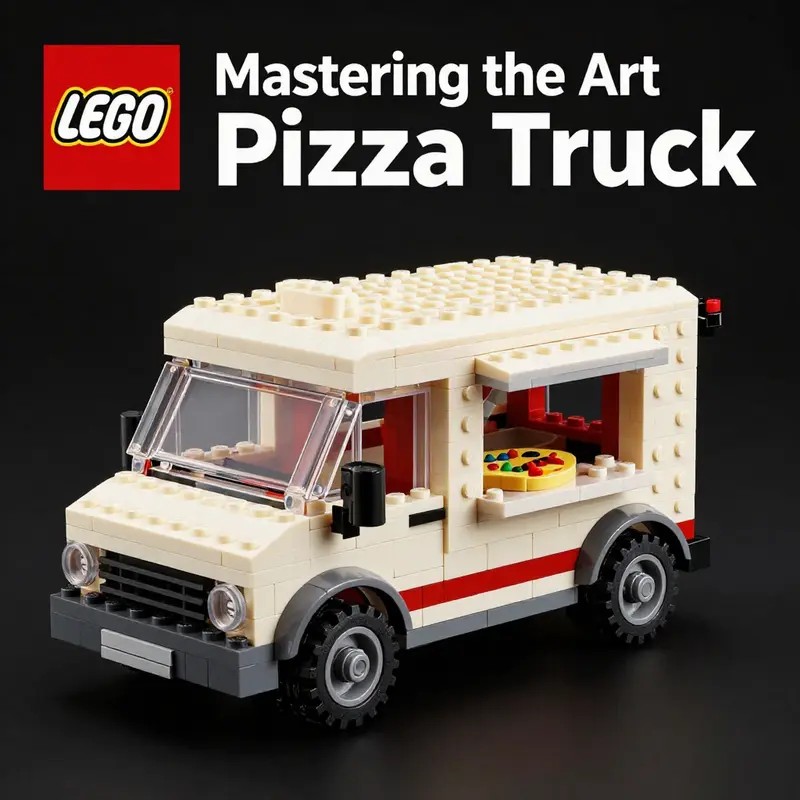
As you map the body, you begin to sketch the space where cooking and service converge. A small, side-mounted “pizza oven” block—simplified with rotating elements or a tile-enclosed mechanism—gives a visual cue that heat and hospitality live here. The oven can rotate or lift with a gentle hinge so a minifigure can pretend to load or retrieve a pie. To preserve playability, place the oven where it can open into a side panel or top hatch, rather than tucked away in a cramped recess. A believable kitchen section also benefits from an opening kitchen hatch that mirrors a real delivery truck’s service window. When a mini-chef slides a tray across the counter, the moment becomes a small theater of action—a crucial driver of engagement for kids and collectors alike. The build then invites the addition of a display counter, crafted from flat tiles and small bricks to form a clean surface where pizzas or pizza boxes can be showcased. The counter acts as a storytelling element as well; it creates a dedicated stage for the chef to perform the daily ritual of serving and packaging.
The chassis deserves its own attention because it anchors the truck’s proportions. Four wheels on axles, attached to a robust undercarriage, ensure smooth rolling over carpet or wood floors alike. The aim is not just to stand sturdy; it is to enable a tactile rolling capability that invites a quick, satisfying push or pull, like a real courier maneuver during a crowded street scene. If the model leans under the weight of a loaded oven, distribute mass across the length of the truck with a discreet second floor or a low shelf layer. This redistribution can be achieved with careful stacking of bricks and plates at key points along the chassis, aligning the center of gravity with the wheelbase so the truck sits evenly when displayed on a shelf or photo table. The moral here is to balance weight, height, and reach. A tall, top-heavy build may topple when a minifigure leans in to inspect the oven, so it helps to keep the center of gravity a touch lower than the top of the vehicle while still allowing a sense of vertical energy in the design.
When it comes to the detailing that turns good structure into a convincing scene, small touches matter. Windows framed with clear bricks create the impression of glass, while door plates suggest access doors that a driver or a staff member might swing open during a busy shift. The oven’s door is a tiny drama in itself: a hinged 1×2 plate or a 1×2 tile can serve as a door that swings outward, letting a minifigure “peek” inside as if checking for perfect dough balance or a hot pie ready to go. The side or rear panel can host a simple, buildable sign that reads “pizza” or a stylized logo, using stickers or printed tiles if available, which adds a commercial air that resonates with the everyday life of a food truck. The goal is not to overwhelm the model with too many moving parts, but to pick a handful of purposeful features that are satisfyingly interactive when a child or collector pretends to run a late-night delivery run.
The display area, often positioned near the forward side of the truck, becomes a place where narrative and color meet. A front or side panel can hold a small display counter, where round, flat pieces stand in for fired pizzas, or where you place a few triangular “slice” shapes to indicate different flavors. To emphasize the pizza theme, incorporate a few circular bricks as the “pies” and use a couple of round plates to suggest sauce and cheese. If you want a little extra sparkle, mount a swiveling shelf that holds a tiny pizza box or a cup for drinks, reinforcing the sense that this is a complete, working food truck with room for improvisation. The inclusion of minifigures and accessories—chef, driver, cash register, and a small delivery bag—transforms the truck into a theater of everyday commerce, where a family can imagine a queue of hungry customers and a driver who points toward the next drop-off.
In the earliest drafts, you might test two or three variations of the body’s silhouette before settling on a final shape. This is where the iterative spirit of building shines. A longer wheelbase can convey a more expansive kitchen area; a shorter one can suggest a nimble city truck designed for urban pop-up events. The trick is to let function drive form and form support function. For example, a slight overhang at the rear can host a compact storage box or an extra shelf for utensils, while an upturned bumper can protect delicate hinge assemblies during play. It is a small design choice, but one that adds to the sense that the truck is not merely a static sculpture but a dynamic tool for storytelling.
One practical tip that emerges from experience is to preassemble critical junctions before integrating them with the main chassis. Construct a modular oven unit on its own plate, then attach it to the side panel with a hinge that you can easily swap if you later decide to reorient the oven. Similarly, build the serving counter as a separate module that can glide into place, giving you a straightforward way to adjust if you want a different party layout or a larger display area. Such modular thinking reduces the fear of making a mistake and opens up opportunities for experimentation without sacrificing structural integrity. When you pick colors, consider a base of red for the body, with white panels to brighten the sides, and a touch of yellow on trim elements to evoke the oven’s heat and the cheerful energy of a street festival. The aim is to strike a balance between visual appeal and sturdy mechanics, so the model remains satisfying to play with and sturdy enough to photograph from any angle.
As you refine the body, you will likely want to study a few reference models for guidance. Official set instructions provide clean methods for vehicle construction and can inspire your own adaptations. For instance, a well-documented pizza van from a popular city theme includes an opening kitchen area, a chef minifigure, and a space for a pizza box on a scooter, offering excellent ideas for both structure and function without dictating your exact build. Reading these references can reveal practical tricks—how to hide extraneous bits behind panels, how to route a hinge so a door doesn’t hit a display tile, or how to position a small refrigerator element beneath the counter without crowding the aisle. The value of such references lies not in copying but in translating their solutions into your own LEGO language. You will recognize patterns that recur across many builds: the way a hinge can rotate to reveal a hidden storage area, the way a plate and tile combination can form a clean, professional surface, or the clever use of brackets to reinforce a panel without adding bulk. If you want a direct, visual invitation to these ideas, you can explore the broader building guides that accompany official vehicle sets; they illustrate the interplay between movement, aesthetics, and sturdiness in ways that map well onto a pizza truck concept.
To keep the project grounded in practice, it helps to think about the sequence of assembly as a narrative arc. The base is the prologue, the chassis and wheels setting the stage for the bustling middle acts of kitchen dynamism and customer service, and the signage and display a final flourish that invites play. Think of the truck as a small theater on wheels, with each element a prop that supports the story—a chef flipping a pizza, a customer stepping up to the window, a scooter tucked behind the seat as a reference to delivery potential. In this sense, the body is not just a container for bricks; it is a framework that supports the imagination, a structure where color, function, and story align to create a convincing, lovable model that can be posed for a photo, rolled across a tabletop, or reconfigured for a new scene with little more than a few strategic swaps of panels and tiles.
If you are looking for a connective thread to broaden your build, consider how this body aligns with the typical rhythm of a food-truck fantasy. The base and the kitchen share the stage with display and service; the wheel assembly anchors motion; the sign and logo provide identity; and the minifig crew gives the world a voice. The sketch of this LEGO pizza truck, therefore, becomes less a fixed diagram and more a living plan that you can adapt as you grow more comfortable with brick connections and play patterns. It is a design that invites experimentation with minor alterations—changing the oven angle, adjusting the counter height, or swapping out a door panel for a larger window to invite more light into the kitchen. The process of altering a working model is a form of play itself, one that reinforces the idea that a LEGO vehicle is never finished, only ready to become something else in the hands of a curious builder.
As you finalize this chapter of the build, you may want to connect with a broader community of builders who enjoy turning ordinary city vehicles into culinary icons. The joy of this process lies as much in the decisions you make about how each element interacts as in the final appearance. A single hinge, a carefully chosen plate thickness, or a bright accent color can shift the entire feel of the truck from a simple toy to a convincing little business on the move. And while the structure remains the backbone, it is the small, personal touches—the custom signage, the tiny display of pizzas on the counter, the imagined buzz of a busy street—that truly animate the model and invite others to tell stories about it. If you wish to see a practical, step-by-step approach to building a food-truck in a LEGO context, you can explore resources that translate real-world assembly ideas into brick-built solutions, and which often show how to blend a functional kitchen with a ready-for-action exterior. These ideas can help you refine not just the look of the truck but the feel of its operation, creating a cohesive, satisfying play experience that resonates with fans of both LEGO and street-food culture. And if you ever want to broaden the scene, there are easy paths to expand this concept—perhaps a second vehicle for a street market, or a tiny drone-camera accessory for a future delivery scene—yet the core remains the same: a sturdy body, a convincing kitchen, and a little theatre of flavor on wheels.
For readers who want a quick pathway to a broader blueprint, you can consult community resources that translate established designs into personalized builds. A well-regarded tutorial from the LEGO-building community demonstrates how to adapt existing designs with your own flair—things like modifying side panels to alter silhouette, or adding detailed rear mirrors to convey depth and realism. These demonstrations are valuable not because they prescribe one exact method, but because they illuminate a flexible approach to design. They encourage you to think about what you want your pizza truck to do beyond merely looking the part: to have a functioning kitchen, to offer a small display, to carry a delivery bag, or to run a playful scene with rival vehicles in a bustling city. In short, building the body and its moving parts is not only about assembling a vehicle it is about building a little theater on four wheels, a vehicle that can be configured, reconfigured, and reimagined again and again as your brick collection grows.
As you reach the end of this segment of the build, pause to appreciate how far your truck has come. The base anchors the project; the body forms the stage; the oven, serving counter, and display area bring the kitchen to life; and the branding completes the personality. This is the moment where you decide how much of the truck’s operation you want to reveal in play. Do you prefer a compact, efficient setup that concentrates action at the serving window, or do you want a more expansive kitchen area with extra storage space and a broader display? Either choice is valid, and each choice shapes the kinds of stories you will tell with the model. As you prepare to move beyond the body into the realm of accessories and storytelling—signage, branding, and interactive features—the careful attention you gave to the chassis and the basic elements will continue to pay off. The truck will not merely exist as a display piece; it will invite children and collectors to stage a vibrant, ongoing world of food, speed, and street-life energy, a world in which a brick-built pizza truck can roll, serve, and spark a small adventure with every push of the wheels.
To explore further inspiration while you work, consider this internal resource for related build ideas and tips on turning a pizza truck into a fully imagined mobile business: how to build a pizza food truck. It offers a broader look at the logistics of a pizza truck and the narrative potential behind a mobile kitchen, which can inform your decisions about scale, function, and storytelling momentum. In the spirit of practical, hands-on creativity, the journey from base to bustling kitchen is not about copying a single blueprint but about absorbing core strategies and translating them into your own brick-by-brick language. The more you practice balancing stability, accessibility, and play value, the more confident you will become at shaping future iterations—perhaps a compact city delivery van with a fold-out menu, or a larger, festival-ready truck with extra display space and a detachable scooter for on-the-go errands. Each refinement reinforces a simple truth: the body is the heartbeat of the build, and when it breathes smoothly, the entire project feels right—and ready for the next scene.
External resource for reference and further exploration: the official product page for a pizza van set provides a concrete example of an opening kitchen area, a chef figure, and a storage space for a pizza box on a small scooter. This model demonstrates the balance between form and function that you are working toward in your own LEGO pizza truck build. https://www.lego.com/en-us/product/pizza-van-60150
Detailing a LEGO Pizza Truck: Crafting Custom Features for Playful Realism
A LEGO pizza truck begins as a sturdy frame and a simple flavor profile—a chassis that rolls, a cabin to shelter minifigures, and a display that hints at what the business is selling. To turn that baseline into a storytelling machine, you lean into details that matter to how the vehicle would actually run in the real world and how children will interact with it during play. The most effective additions are not merely decorative; they are functional, modular, and responsive to the kinds of stories you want to tell around the truck. The process invites patience, experimentation, and a willingness to test fit, reconfigure, and refine. Start with the basics, then layer in modular elements that can be swapped, expanded, or removed depending on the scene or game you’re building. A small kitchen, a working counter, a delivery window, and a few well-chosen accessories can push a simple brick model toward the vitality of a fully realized mobile kitchen on wheels. The heart of this approach is balance: you want authentic cues without sacrificing the ease of play or the structural integrity of the build. The result is a LEGO pizza truck that not only looks the part but behaves like a real, moving stage for your imagination.
One of the most powerful tools at your disposal is a digital planning space that travels with you as you build. The LEGO Builder App offers a compelling way to zoom in and inspect every corner, rotate your model to test angles, and track how a change in a single section echoes through the rest of the vehicle. When you’re adding a pizza oven, for example, you’ll want the oven to feel integrated rather than tacked on. The app helps you visualize how the oven vent, the counter clearance, and the delivery window relate to the driver’s seat and the serving area. This perspective is more than a convenience; it’s a design discipline. By visualizing your truck from multiple angles, you avoid awkward gaps, ensure stable connections, and spot potential interference with wheels or doors before you reach for another brick. It also becomes a handy record of what you’ve tried and what works, which is invaluable when you come back to the project after a break.
Inspiration can come from a wide range of sources, and you don’t need a specific product name to benefit from it. A celebrated city-themed pizza truck set, renowned for its kitchen layout and service counter, provides a template you can adapt with your own twists. The essence of that design is a compact kitchen guarded by a serving counter, a delivery window that invites interaction, and a layout that keeps both cooks and customers in the same ecosystem. From this starting point you can push the design toward more elaborate features: a dedicated pizza oven with a rotating display, a grill for sizzling side dishes, and a side compartment that could store napkins, sauce packets, and recipe cards for the minifigures. You can even imagine a small, hidden tray under the counter for a delivery bag or cash register. The important thing is to borrow the structural logic rather than the exact parts. Keep the feel of a working kitchen, but tailor it to your inventory and your play wants. If you share your progress with friends or a maker community, you’ll often receive practical ideas about scale, hinge placement, and how to route the airflow from a pretend oven without compromising the truck’s sturdiness.
The beauty of LEGO building lies in modularity, and this is where your pizza truck can truly shine. Consider designing detachable sections that can be swapped or expanded as your story evolves. A mobile food-cart extension, for instance, can be snapped on to the side or the back of the truck with simple clip-and-plate connections. When you’re ready to host a bigger menu or a longer delivery route, you can detach this module to simulate a larger catering event—the same vehicle, a different scale of operation. Another module might be a larger pizza oven area, crafted with a separate wall, a vent, and a small access door so the cook can reach into the oven without bending the entire truck’s structure. A third module, a pop-up awning, instantly signals a shift from an indoor-style service to an outdoor setup. The awning can be folded out during a sunny day scene and retracted when rain is part of the narrative. The beauty of these detachable elements is the flexibility they offer. You can reset scenarios quickly, rehearse new service strategies, and teach younger builders how to reconfigure a model without disassembling the entire chassis.
Playability is the second axis of refinement. Lessons from real-world food trucks—where space is tight and efficiency is everything—translate neatly to LEGO. A couple of carefully placed features can dramatically improve how a scene plays out. A clear, reachable serving counter invites minifig customers to place their orders, while a small display on the counter with flat tiles or bricks can represent pizzas waiting to be picked up. You can position a tiny, stylized cash register near the driver’s seat, letting the minifigure driver greet orders and hand over meals with smooth, believable exchanges. The interactive appeal comes from storytelling cues: a cook leaning over the oven to slide a pizza in; a delivery driver rushing to load a bag into a side compartment; a customer peeking through a delivery window to confirm a combination of toppings. The more life you encode into the set, the more compelling play becomes, and the more you’ll want to return to the truck with new ideas.
A surprising well of ideas comes from the broader universe of LEGO pieces. You don’t need to stay strictly within a single theme to keep the pizza truck vibrant. Accents can come from a variety of sets you already own: a sauce-dispensing nozzle or a drink mixer from a food-stall kit, a bright canopy from a market stall, or decorative tiles that suggest signage and branding. The trick is to curate these pieces thoughtfully, so they feel like part of a cohesive system rather than an accidental jumble. When you blend elements from different sources, you raise the truck’s personality and widen the range of services it can offer. The display area, for example, becomes not just a static counter but a dynamic feature where you can rotate your pizzas into new configurations, showcase a rotating pizza display, or even create a small cross-sell zone for desserts or beverages. A few minifigures can help sell the sense of a bustling, friendly business: a chef with a tall hat, a delivery driver in a branded jacket, and a couple of customers ready to interact with the truck. The figures don’t have to be elaborate; they simply need to convey the flow of activity that makes the truck feel alive.
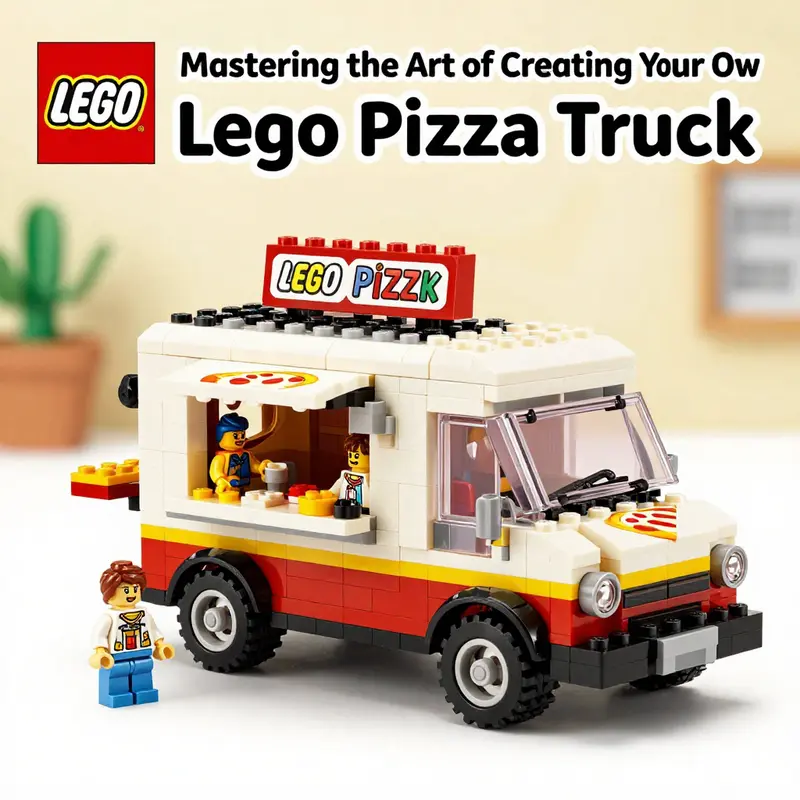
As you expand, you’ll likely seek personalization that makes the truck unmistakably yours. Custom license plates are a playful, simple touch that adds character and backstory. You can craft tiny banners that fly over the truck or across the awning, signaling seasonal specials or a playful branding concept. A set of tiny LEDs, whether simulated with translucent bricks or a small, battery-powered circuit if you’re mixing in electronics, can illuminate a sign on the roof or a front-facing display, turning the truck into a nighttime beacon in your play sessions. The key to successful personalization is restraint. A bold, single motif across the sign and a couple of well-placed color accents will feel deliberate and cohesive, while an overabundance of decals and gimmicks can dilute the visual language and make the truck seem chaotic rather than charming.
When you think about the sign, you’re not just thinking about visibility; you’re shaping a narrative cue. A crisp, legible sign telegraphs the brand to any onlooker, whether that be a child tearing through a bedtime story or a friend peering at a play scene across the table. A logo-inspired emblem on the side of the truck can anchor the design, and corresponding color blocks on the awning and the display counter reinforce the identity. Tiny details matter here: a few printed or stickered tiles can imply a menu, while subtle touches like a napkin holder or a cup rack on the side give the impression of a fully stocked operation. The storytelling power grows when each feature has a rationale within the world you’re building. The oven implies a need for quick throughput; the delivery bag hints at a last-mile service; the awning connotes outdoor dining or a special event. When every piece serves a purpose in the story, the truck earns its place in your imagination and in your display space.
There is also room for whimsy and experimentation that keeps LEGO building refreshing. You can try non-traditional materials or colors to push the toy into a more magical realm. Candy-colored bricks or unusual shapes—like curved slopes that evoke a retro-futurist aesthetic—can give your truck a distinctive silhouette. A whimsy approach is not about ignoring realism but about inviting different kinds of play. A bright, candy-pink oven glow or a teal delivery box might signal a special menu or a weekend carnival. The question to ask as you test these ideas is not only whether the look reads well on the shelf, but whether it invites action when hands reach for the bricks. If a feature seems visually appealing but seldom used in play, it’s worth reconsidering its size, placement, or even its existence. The best custom features are those that see frequent interaction, opening up opportunities for new scenes, dialogue, and pace in your play sessions.
To bring all of this together, you can imagine your LEGO pizza truck as a living, evolving entity rather than a fixed diorama. Think of it as a mobile kitchen that can grow with your imagination, much like a real food truck would adapt to crowds, weather, and evolving menus. The modular modules you design are not just for convenience; they become narrative devices. The detachable extension can signal a larger city event; the pop-up awning can mark a seasonal celebration; the larger oven module can mirror a menu expansion with a wider array of toppings and pizza sizes. Each change carries with it new beats for play, new dialogue lines for the minifigures, and new opportunities to stage a scene that fans of the real-world food-truck story would recognize and enjoy.
If you want a practical starting point for this kind of play-oriented detailing, consider exploring a curated piece focused on the experiential side of building a pizza truck, which digs into what makes a model feel alive and ready for interaction. For a practical sense of how a playable pizza truck can come to life, see Pizza Truck Experience. And as you plan your next steps, keep the following guiding ideas in mind: prioritize modularity, ensure each feature serves a purpose within the story, and let the sign and the service area read clearly from across the table. The LEGO toolkit is generous, and the constraints you set for yourself—like a limited color palette, a fixed number of hinged elements, or a specific scale—can sharpen your design decisions and accelerate the path from a decorative model to a dynamic playset.
As you refine, document your progress in whatever way helps you best. Take photos of different configurations, sketch quick layouts for the oven, the counter, and the delivery window, and note which pieces feel sturdy and which need a touch more support. The act of documenting is itself a creative workout: it reveals patterns in your decisions, shows you where you like to push the limits, and helps you translate that taste into future builds. A well-documented process also makes it easier to share your approach with others, inviting collaboration and new suggestions that can spark a fresh wave of ideas for future iterations. In time, your LEGO pizza truck may evolve from a convincing static model into a fully tested, story-rich vehicle that invites friends to join in the play, swap modules, or propose new adventures on the road.
For readers seeking a compass to navigate this growing complexity, a simple but effective rule is to keep core functions intact while experimenting with add-ons. The core functions are the drive system, the kitchen, and the service counter. Everything else—extra displays, detachable modules, and decorative flourishes—should enhance or expand those core capabilities. If a new feature makes the truck harder to play with or threatens stability, it’s worth revisiting its design or removing it entirely. The best enhancements are those that invite more storytelling rather than complicating the act of playing. With a patient approach, your LEGO pizza truck becomes a tellable part of a wider urban world you construct brick by brick, scene by scene, while still staying within the comfortable reach of your hands and imagination.
If you’re curious to see how others translate these ideas into their own builds, you can explore related experiences and reflections in community discussions and write-ups centered on the broader world of mobile food design in brick form. Pizza Truck Experience. This kind of resource can be a helpful companion as you iterate, offering fresh angles on how to position the oven, where to place the service counter for optimal reach, and how to stage a delivery handoff that feels natural and satisfying for players of all ages.
External resource: https://www.lego.com/en-us/product/pizza-planet-truck-rescue-10859
Final thoughts
Creating a LEGO pizza truck not only showcases your brand’s creativity but also serves as a valuable marketing tool that resonates with both children and adults alike. By assembling the base, crafting the body, and adding unique details, business owners can effectively engage their audience and impart their culinary vision in a fun format. This imaginative approach to representing your pizza business can open new avenues for storytelling and customer interaction, reinforcing your brand presence in the community. As you embark on this exciting project, remember that each LEGO piece brings you a step closer to your pizza truck dream.